Posts Tagged ‘bike maintenance’

Tyres and brake discs

Friday, August 14th, 2020 | Sport

A few weeks ago, I was cycling with Bramhope when something shredded my rear tyre. I’m not sure what it was, but it left a gash so big that the liquid sealant inside the tyre couldn’t seal it. Worse still, I couldn’t get the tyre off the rim, so I couldn’t even stick an inner tube in it.

I was planning to get a bike shop to fix it, but with shops closing and everyone being busy, I decided to give it a go myself.

Getting the tyres off is a nightmare. I specifically bought Mavic UST because it was supposed to be super-easy to get the tyres on and off the rims. It is not. I spend literally an hour trying to get my new tyre onto the rim. In the end, I gave up and used tyre levers. Once I had done that I got it on within five minutes, but I needed two of the things and I snapped one of them.

Once I got the things on they were at least easy to inflate. I managed it with the track pump. I’m using the Muc Off tyre sealant that, as the reviews promised, really did smell lovely. The advantage of re-doing my tyres was that I could get the tyre and rim logo lined up.

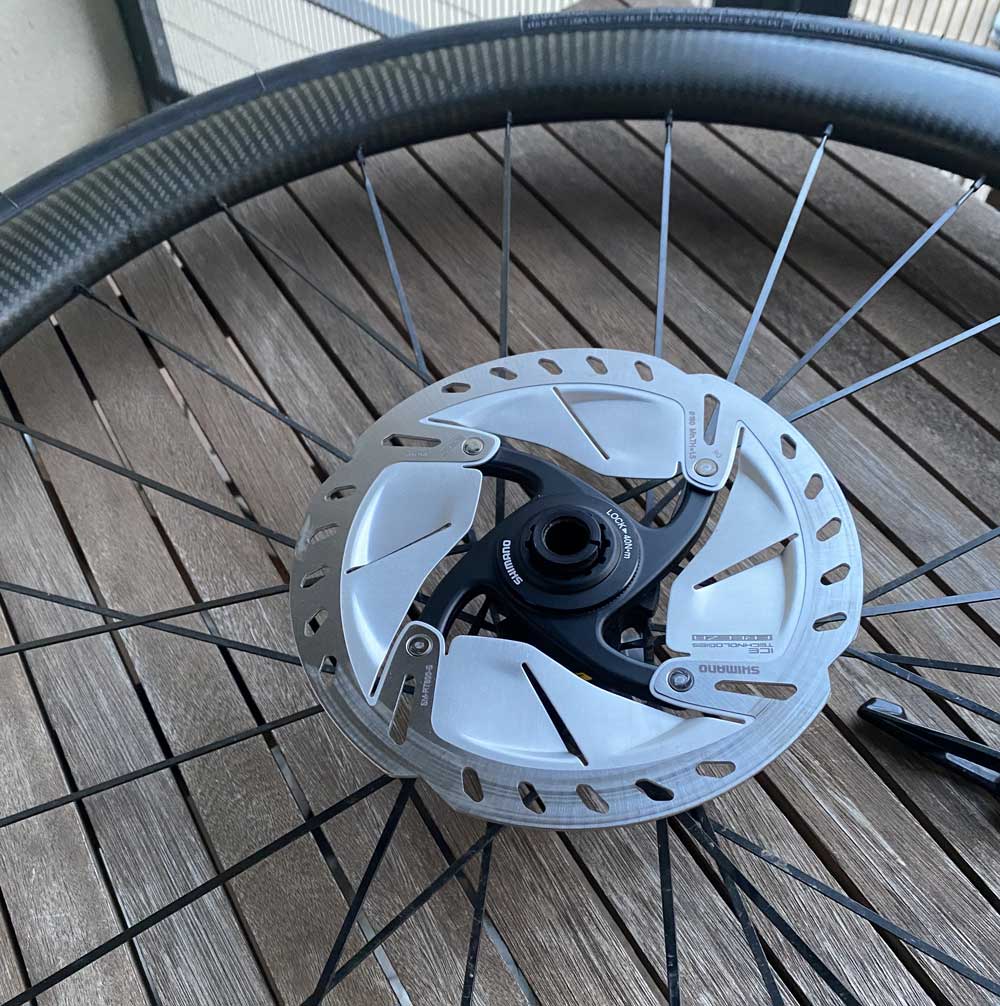
The next thing I wanted to do was to put some brake discs on my old wheels so I could easily swap to the old wheels if I needed so. So, I brought a shiny new Ultegra brake disc to try it. Turns out it is so easy that I could have just swapped the discs over every time I wanted to switch wheels. But now I have shiny new discs.

And here is the snapped tyre lever…

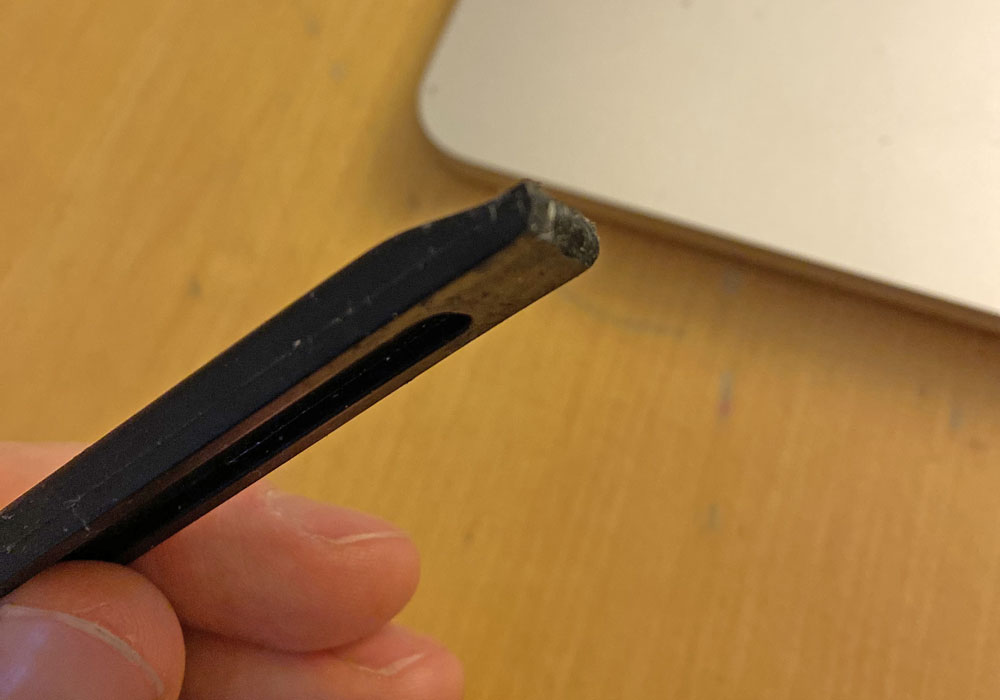
I’ve switched to Bontrager tyre levers now as they look slightly more sturdy (although I have not tested this) and carry three of them in my saddle bag now.

Chris tries to change a bike stem

Wednesday, May 8th, 2019 | Video

In this video, I’ll attempt to change the stem on my bike. The stem is the piece that holds your handlebars to your steerer tube. You may want to use a bigger or smaller stem to dial in the perfect amount of reach (the distance your handlebars are to your saddle).

I’m not calling it a tutorial because I have never done it before, so who knows how it will turn out!

I’m using my Voodoo Limba cyclocross bike. I made the rookie mistake of buying a frame that was too big for me and so I needed to reduce the reach. I moved the saddle forward to put it into a racier position, using my race bike to match the geometry. But I also needed to swap out the 90mm FSA stem for a 70mm stem. Luckily, FSA does such a step, so it should just be an easy swap-out swap-in job.

The first step was to take off the reflector which was blocking access to the bolts holding the stem’s front plate in place. I then loosened these a little at a time to avoid putting too much stress on any bolt. Once the faceplate was off, I let the handlebars dangle down. I had my bike on the turbo, rather than in a stand, so there was no chance the forks would drop out.

Next, I removed the dust cap from the top of the stem and then loosened the bolts holding it onto the top of the fork. Once this was done, it slid off and allowed me to put the new stem on. Then it was merely a case of reversing the procedure.

Getting the new stem in the correct position is a tricky one. The handlebars need to be both in the centre and at the correct angle, and it took me a while to get them just right. After that, I could tighten up all of the bolds, including making sure that the stem lined up with the forks and front wheel.

X-Tools Torque Wrench Set review

Monday, March 4th, 2019 | Reviews, Video

The X-Tools Essential Torque Wrench Set is an affordable torque wrench sold by Wiggle, formerly under the Lifeline brand. In this video, I’ll review it and give you a quick tutorial as to how to use it on the bike.

You need a torque wrench to get the correct tightness on your bike. With cheaper bikes, this isn’t a problem. However, if you have a carbon frame bike, you’ll probably find little stickers everywhere saying 6NM, or something similar, which typically indicates the maximum pressure you can safely apply. This is when you want to use your torque wrench.

It supports a range of 2 to 24NM and comes with ten different heads that can easily be swapped in and out. The smallest being 3mm and the largest being 10mm, with some other style heads, included, too. It all comes in a custom case that allows all of the heads to be clipped into for easy storage and to avoid losing them.

The level of torque is applied by twisting the handle. Don’t forget to take almost all of the torque off (take it down to about 2NM) before storing it.

Leeds Bike Mill bike maintenance course

Wednesday, January 23rd, 2019 | Sport

Earlier this week, I did Leeds Bike Mill‘s introduction to bike maintenance course. It’a four-hour evening session to teach you the basics. Leeds Bike Mill is based in the same building as the Peddler’s Arms, a drop-in bike workshop that is community run.

It met my expectations: it wasn’t as clean and polished as the Evan’s Fix It course, but it was far more hands on. That is far more valuable than watching someone else do it. So, even though four hours seems a long time to change a tyre, do an M check and fiddle around with the brakes, it’s sort of understandable where that time went.

We also covered gears, which both Evan’s and Woodrup didn’t really do, so it was nice to take a look at that because gears are always my biggest problem on the bike. Unfortunately, I didn’t get time to do any adjustments in the workshop itself and on the way home my chain fell off. Still, a chance to ride my old bike has eliminated any buyers remorse about the one I am riding now.

All in all, I would recommend if you want to cover the basics of bike maintenance.

Evans Fix It course

Monday, January 14th, 2019 | Sport

Last month, I attended the Evans Fix It course on bike maintenance.

It was supposed to be an hour’s course and cost £15. As it was, we ended up getting an hour and a half of tuition for our money. It covers the basics: parts of the bike, the M-check, changing a tyre, cleaning and a little bit on adjusting gears.

There were only two of us on the course, so it extra friendly, and we were able to look at specific setups for our bikes. We call ran disc brakes, for example, so could skip over the rim brakes content pretty quickly.

Plus, we got to see the secret downstairs area, and you come away with a goodie bag containing cleaning products, a multitool, tyre levers and a patch kit. All in all, therefore it was great value: 90 minutes of learning, plus a load of useful stuff that I needed anyway.

The only drawback was that it was a demonstration, rather than a hands-on exercise. I was a guinea pig for a course at Woodrup the week before, and in that we got hands-on, changing the inner tube on a tyre. There is no replacement for actually doing it.

I would still recommend the Evans course, though, because it is still a bargain. Ideally, do both. I’m not naturally mechanical, so I’m looking for all of the learning opportunities I can get.