Posts Tagged ‘cycling’

Shimano PD-M530 bike pedal review

Thursday, May 9th, 2019 | Video

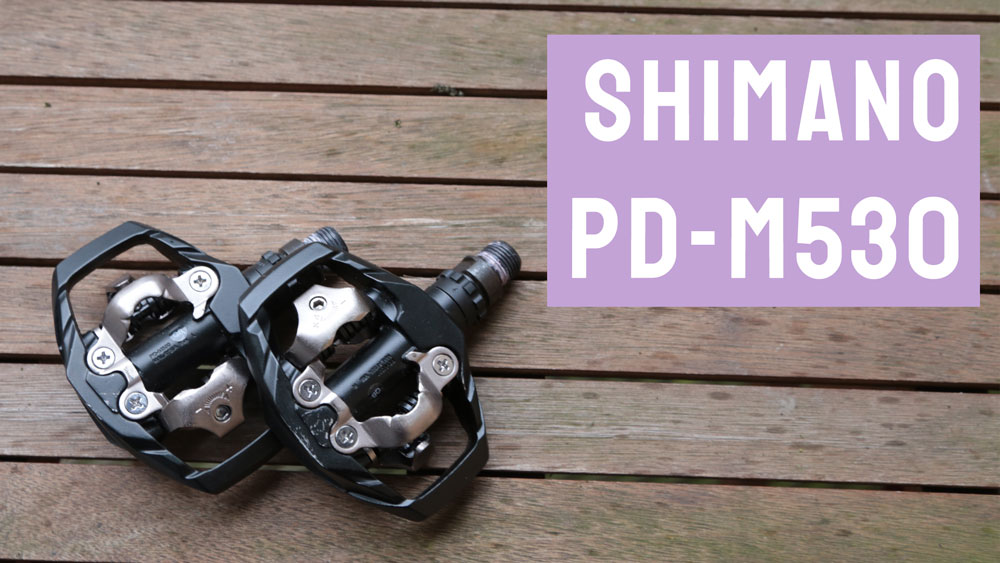
The Shimano PD-M530 is a dual-sided SPD bike pedal. SPD is Shimano’s two-point mountain bike cleat but is also a favourite for commuting or those who are new to clipless pedals because it is easier to clip in and out of than the road version, SPD-SL.

The M530 has SPD cleats on both sides. This means that you do not need the pedal to the be the correct way up; you can push your foot down, and it doesn’t matter what side it is on.

The pedal comes with the standard dial to make it easier or more difficult to clip in and out of. Being dual-sided, though, means that you have two dials on each pedal which means you have to set the tension to how you like it four times in total.

They are mostly black, which should match standard crank arms. They have a larger surface area than other styles of SPD pedals, such as egg beaters, which makes it easier to find with your foot. You won’t be able to use them as flats, though, as your foot always makes contact with the cleat. And, having a larger surface area, they are heavier than other types.

If you like the look of these pedals, you may also want to consider the Shimano PD-EH500, which is similar but has a flat side as well as an SPD side, allowing you to choose between clipless and flats. In the video, I’m actually demoing the EH500, but only on the SPD side, which is identical to the M530.

Music credits: The Kyoto Connection – Fly

Chris tries to change a bike stem

Wednesday, May 8th, 2019 | Video

In this video, I’ll attempt to change the stem on my bike. The stem is the piece that holds your handlebars to your steerer tube. You may want to use a bigger or smaller stem to dial in the perfect amount of reach (the distance your handlebars are to your saddle).

I’m not calling it a tutorial because I have never done it before, so who knows how it will turn out!

I’m using my Voodoo Limba cyclocross bike. I made the rookie mistake of buying a frame that was too big for me and so I needed to reduce the reach. I moved the saddle forward to put it into a racier position, using my race bike to match the geometry. But I also needed to swap out the 90mm FSA stem for a 70mm stem. Luckily, FSA does such a step, so it should just be an easy swap-out swap-in job.

The first step was to take off the reflector which was blocking access to the bolts holding the stem’s front plate in place. I then loosened these a little at a time to avoid putting too much stress on any bolt. Once the faceplate was off, I let the handlebars dangle down. I had my bike on the turbo, rather than in a stand, so there was no chance the forks would drop out.

Next, I removed the dust cap from the top of the stem and then loosened the bolts holding it onto the top of the fork. Once this was done, it slid off and allowed me to put the new stem on. Then it was merely a case of reversing the procedure.

Getting the new stem in the correct position is a tricky one. The handlebars need to be both in the centre and at the correct angle, and it took me a while to get them just right. After that, I could tighten up all of the bolds, including making sure that the stem lined up with the forks and front wheel.

Easter Sunday ride

Thursday, April 25th, 2019 | Sport

As if the punishment from Good Friday’s 84km wasn’t enough, I set out to do a round trip to York on Sunday. I collected Bogdan from Rothwell and we headed along the quiet roads of East Leeds to Cycle Heaven’s Naught-E cafe in the centre of York.

The cafe has a good range of stuff: full cooked breakfast and a wide selection of nice cakes. I opted for a bacon sandwich and a brownie. And we timed our arrival just right, getting there three minutes after they had opened.

The way back had some inevitable headwind but this died off the further we went. In total, the distance came to 110km, making it a new personal record for me, although only by 4km. I’m feeling like I should have done way more than that given the Yorkshireman is only nine weeks away, but putting nearly 200km into my legs over a weekend and still feeling good has been a confidence boost.

HPH Good Friday ride

Thursday, April 25th, 2019 | Sport

On Good Friday, I went cycling with Hyde Park Harriers triathlon club. Around twenty of us set off from the Three Horse Shoes in two groups: a “fast” group and a “social” group, with both being respectable rides that took in some hills.

I managed to hold the wheel of the fast group as we made our way to Bolton Abbey for some cake at the pavilion. We then took in Langbar, which was not as bad as I was expecting, before descending (and then climbing, because it’s Yorkshire) to Golden Arce park for ice cream and finally The Stables for a beverage of a refreshing nature.

In total, it amounted to 84km and just over 1,000 metres of climbing. A lovely way to start the Easter weekend.

Garmin Extended Display Mode: not so useful?

Friday, March 29th, 2019 | Reviews, Sport

Garmin Edge computers come with a feature called “Extended Display Mode” that allows you to relay your Forerunner watch data through your bike computer. This sounds super handy for triathlon because you will be tracking the activity through your watch, so relaying the data you are already capturing makes a lot of sense.

In reality, though, it’s not a particularly useful feature.

The data screens are driven by the watch. That means that you can only have a few fields on there. I like to have a tonne of stuff on my display, and at very least I would like to see my speed, power, heart rate and cadence. So, I think I’ll be sticking with running them independently for now.

LBT Brownlee duathlon video

Thursday, March 28th, 2019 | Sport, Video

Yesterday I wrote about the duathlon I took part in at the Brownlee Centre. I recorded the bike section on my action camera and I have overlayed my speed, power and heart rate onto the video. It’s predictably dull, but I have added some commentary over the top to make it less dull lol. In my defence, this isn’t why I bought an action camera.

The hyper smooth video does a good job, although I find it a bit weird. The background stays fixed in position as everything else dances around. It looks a bit unnatural but does produce something that is easy to watch.

Mavic Crossride bike shoes review

Friday, March 8th, 2019 | Reviews, Video

At first glance, you may not realise the Mavic Crossride are bike shoes. They look like trainers. But, hidden beneath the bright yellow sole is an inset SPD cleat (mountain bike cleat) that allows you to ride clipless while wearing a really comfortable shoe.

In this video, I’ll review the shoes and show you what they look like while cycling.

They’re not trainers, as you figure out when you put them on. The rubber sole is big and chunky and takes out a lot of the flex. They suggest you could go hiking in them, and that’s true, but you couldn’t go running in them because the sole is too thick and because the metal cleat does make contact with the ground. It doesn’t leave you walking like a duck but you can hear the clink.

Making them more comfortable and a little more flexible also means that they are not as stiff as road shoes. But that is the standard trade-off with mountain bike shoes.

The upper comes with both laces and a velcro strap. I tend to tie the laces in a single knot and then use the velcro strap to do the final tightening, which is easy to re-do later if it turns out you tied them a little loser than you would like.

Shimano TR5 review

Wednesday, March 6th, 2019 | Reviews, Video

The TR5 is a triathlon cycling shoe from Shimano. In this video, I’ll review and it and show you what it looks like while cycling.

What exactly is a triathlon cycling shoe? It’s a lot like a regular bike shoe. But it has some modifications specifically designed for triathlon racing. First, it has a mesh in the bottom to allow water to drain out. They’re also comfier than some bike shoes. This allows you to come straight out of the swim and jump on the bike without having to dry your feet or put socks on.

They come with a loop at the back of the shoe that allows you to rubber band it to the back of the bike, keeping the shoe the correct way up. Finally, the velcro strap opens outwards to allow the shows to remain on the bike without the strap getting caught in the chainring. This does mean the end of the strap can rub against the crank arm so you may have to trim this down once you have worked out how much strap length you need for your foot.

The TR5 is the smaller brother of the high-end TR9. It’s not clear what additional benefits the TR9s provide, though, other than coming in blue. The TR9 is only road cleat compatible, whereas the TR5 supports both road and SPD (mountain bike cleats). They’re not inset, though, so whichever one you choose you will end up walking like a duck. Not a problem if you keep the shoe on the bike in transition, though.

The sole is very stiff, as you would expect from a road-style shoe. There isn’t much weather protection on top, which makes sense given they are built to let water drain out of the bottom. They come with two velcro straps. Once you have the first one dialled in you will probably never need to touch it.

Topeak Tri DryBag review

Tuesday, March 5th, 2019 | Reviews, Video

The Topeak DryBag Tri-bag is a top tube bag designed for triathlon, or anyone else looking to add some additional storage to the top tube of their bike and keep the contents dry in all conditions. In this video, I’ll review it and show you what it looks like when cycling.

The bag is easy to install. It has two velcro straps underneath and one that loops around the stem. It doesn’t sit flush on the top tube, though, unless you’re willing to be really generous about looping the front loop around the steering column.

It is easy to access on the move. Closing is easy if you just want to pin the thing down, but can be a bit more difficult if you want to get all of the straps in place. This is due to the heavy duty waterproof top that seems to do the job well. Another trade-off for the waterproofing is that there is no easy way to get a cable out if you want to stick a power pack or phone in there.

Because it is so tall it can get in the way of you. This isn’t a problem for me when I am sat down, but it does tend to get in the way when I start climbing or sprinting out of the saddle. That said, it doesn’t annoy me enough to do anything about it.

In terms of space, it is pretty limited. It is just about big enough to fit an iPhone 6 / 7 in there, but not if you have a cover on it. I do so that rules that out. It’s just about long enough to fit an energy gel in there, so I typically fill one side with 3-4 gels and the other side with a power pack for my phone.

Overall, I think there are a fair few drawbacks to this bag. But, it has successfully served its purpose so far, so it hasn’t annoyed me enough to replace it.

X-Tools Torque Wrench Set review

Monday, March 4th, 2019 | Reviews, Video

The X-Tools Essential Torque Wrench Set is an affordable torque wrench sold by Wiggle, formerly under the Lifeline brand. In this video, I’ll review it and give you a quick tutorial as to how to use it on the bike.

You need a torque wrench to get the correct tightness on your bike. With cheaper bikes, this isn’t a problem. However, if you have a carbon frame bike, you’ll probably find little stickers everywhere saying 6NM, or something similar, which typically indicates the maximum pressure you can safely apply. This is when you want to use your torque wrench.

It supports a range of 2 to 24NM and comes with ten different heads that can easily be swapped in and out. The smallest being 3mm and the largest being 10mm, with some other style heads, included, too. It all comes in a custom case that allows all of the heads to be clipped into for easy storage and to avoid losing them.

The level of torque is applied by twisting the handle. Don’t forget to take almost all of the torque off (take it down to about 2NM) before storing it.