Archive for the ‘Programming’ Category

Surviving the JavaScript ecosystem updates of 2018

Tuesday, December 18th, 2018 | Programming

When I first launched the WAM website it was built using a reasonably straightforward stack of React + Babel + Webpack. That was a year or two ago and a lot has happened since then. Notably, there have also been some JS security issues, too, so we’re going to start upgrading the stack on a regular basis.

As anyone who has worked with JavaScript knows, though, that is a massive pain in the ass. Here are some notes on the upgrade process.

Upgrading Gulp

Gulp has now moved to version 4. First off, you need to uninstall any previous versions of Gulp. You then install the Guli CLI globally, and the latest version of Gulp locally.

npm install -g gulp-cli

This was a massive hassle. The uninstalls did not work and I had to manually go through the file system to get rid of the thing.

There were also some changes to the config itself. Any paths such as dest('') had to be changed to dest('.'), and all of the functions that defined the Gulp tasks had to now return, rather than just being called.

return gulp.task('name', () => { });

The way tasks were run within them has also changed. So, anywhere that used tp be ['sass'], for example, now needs to be:

gulp.series('sass')

Ugrading Node

You’ll want to upgrade Node to the latest LTS version. This includes editing the engine in your package.json file, especially if you are using Heroku.

Upgrading React

This was as simple as updating the versions in package.json and running an update. However, I did run into a problem with the React CSS Transition group, where I had to update to a drop in replacement.

npm install --save react-transition-group@1.x
npm remove react-addons-css-transition-group

And then change the import statement to import from:

react-transition-group/CSSTransitionGroup

Upgrading Babel

This was mostly a case of bumping the version numbers, but I also had to update my .babelrc file. I think the spread operator was previously a different package, and I had to change the name.

{
    "presets": ["@babel/react", "@babel/preset-env"],
    "plugins": ["@babel/plugin-proposal-object-rest-spread"]
}

Upgrading Webpack

Again, this started with bumping all of the versions. There were also some config changes. Most notably, Webpack now has an environment property.

config.mode = 'production';

It has also changed the way that UglifyJS is brought in if you’re using that to minify your code. You’ll need to install the new package.

npm install uglifyjs-webpack-plugin webpack-cli --save-dev

And then update your Webpack config, too.

config.optimization = {
  minimizer: [
    new UglifyJsPlugin({
      uglifyOptions: {
        output: {
          comments: false
        }
      }
    })
  ]
}

Hopefully this will come in handy if you are upgrading a similar stack and wondering why everything has exploded.

Heroku for PHP course

Wednesday, March 14th, 2018 | News, Programming

I’m pleased to announce the launch of my new course, Heroku for PHP. I love Heroku as a hosting platform, and there were no Udemy courses on how to use it with PHP. So, I’ve filled the gap. For a very reasonable $29.99.

You can check it out here, and that link will save you an additional $10, too.

Mobile-first navigation

Thursday, August 17th, 2017 | Programming

If you have a website, it is not enough to talk about “mobile-first design” anymore. We need to talk about mobile-first navigation, too.

The days of desktop computer terminals are gone. They’re not going anywhere, but most internet access is on a mobile device today. And has been for four years. We all design websites on these big laptop screens, but that isn’t how anybody else is looking at it.

So, we all started adopting mobile-first design.

You make the website look brilliant on a mobile, then re-arrange everything with CSS media queries so that it looks good on a desktop, too. Some people did it because they wanted to offer their users the best experience they could, others because Google announced they would be demoting sites that were not mobile friendly.

What about navigation, though?

Pages that you can read on a mobile device are a big improvement. But we forgot about navigation.

Take a look at The Washington Post’s website:

They have put a hamburger menu icon in the top left. Which is what a lot of websites do.

What’s wrong with this? It puts the menu icon in the on exact place that the majority of users cannot reach with their thumb:

Not great then.

Recently, though, there has been a move to clamp down on this. The UX community has begun to beat the drum of mobile-first navigation. Which is a good thing, because it is about time.

Thinking mobile-first

While web designers have been slow to adapt, app designers have not. Because they actually apps, no doubt. Take a look at most of them and you will see the navigation is on the bottom. Where your thumb is.

Here is the Facebook app, for example:

The NHS’s Change4Life website has embraced this principle, too. On the desktop, you get the navigation at the top:

But when you shrink your device to mobile size, the navigation fixes itself to the bottom:

Welcome to a much better world.

This is how programmers REALLY spend their time

Thursday, June 29th, 2017 | Programming

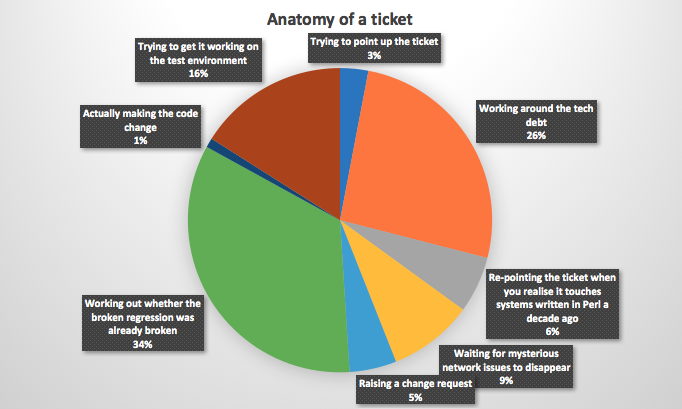
Many people imagine that software engineers spend most of their time writing code. Even in a perfect world, that would not be the case. A properly planned and designed system is always going to beat out a rushed and poorly designed one. But regardless, we are not in such a world. In reality, our time looks like this.

This is why nobody likes Java

Saturday, June 17th, 2017 | Programming

Recently, I wanted to pass a random number into a unit test. Sounds simple, right? It probably would be if I wasn’t writing it in Java.

The problem is that the class expected a BigDecimal. But the random utils returns a string. And you can’t convert a string to a BigDecimal. So I had to convert it to a Long, and then convert that to a BigDecimal. Here is the code I ended up with:

BigDecimal pageNumber = BigDecimal.valueOf(Long.valueOf(RandomStringUtils.randomNumeric(1)));

Which started me wondering: how many ways to represent a number are there in Java? So, I looked it up. And came up with this list:

  1. AtomicInteger
  2. AtomicLong
  3. BigDecimal
  4. BigInteger
  5. Byte
  6. double
  7. Double
  8. float
  9. Float
  10. int
  11. Integer
  12. long
  13. Long
  14. short
  15. Short

Some of these are understandable. It makes sense to have separate storage for decimals and integers, for example. But do we really need a short and a Short? And a total of 15 different types of number? It’s madness.

It wouldn’t be so bad if you could just compare the two of them. Or pass in a number to a function. But it is a strongly typed language. Which means a world of pain when people use different types.

But that is what you get for trying to use a proper language, I guess.

Integrating Apple Pay with your website

Thursday, May 11th, 2017 | Programming, Tech

Over at Worfolk Anxiety, we use Stripe as our payment processor. It’s very good; I highly recommend it to anyone looking to integrate a payment API into their website.

They also have support for Apple Pay. This seems highly desirable as while it is quite easy to enter my credit card details on a desktop computer, it is far more difficult to do on a mobile phone. Being able to click a big Apple Pay button and have it all taken care of is some good magic at work.

Unfortunately, while Stripe makes it super easy to do this, Apple do not.

The dreaded developer program

Most platforms want you to write amazing software for them, so they allow you to do it without much ado. Not Apple. If you want to publish something into the App Store, you have to register for their Developer Program. That is £79 a year. A lot of money, especially if you just want to give away a free app.

However, they also restrict test accounts.

So, for example, if you just want to test whether your website is properly integrated with Apple Pay, you have to pay Apple £79 for the privilege. No wonder it is called “Apple Pay”.

Two fingers to Tim Cook

Luckily, they don’t prevent you from using Apple Pay without the Developer Program. But it does mean the only way to test is to ship code to live and then pay with a real credit card before refunding the transaction.

It’s a total pain in the ass. But it is worth it to avoid giving Apple the money? That’s for you to decide (but yes, yes it is).

How to serve .well-known on Heroku

Saturday, April 22nd, 2017 | Programming

If you want to use Apple Pay on your website, you need to serve a file from inside the .well-known directory. This is a nightmare.

For a start, you can’t create a directory called .well-known on Mac. So you have to find another solution. mod_rewrite to the rescue perhaps? You may be able to get this working, but I couldn’t. I just got a 403 permission denied on Heroku.

client denied by server configuration: /app/public/.well-known

So I decided to try Alias instead.

This was easy to configure on my localhost. I created a directory without the period and then used Alias to map it.

Alias "/.well-known" "/Users/me/Projects/ProjectName/well-known"

To configure it in Heroku, I created a custom Apache configuration file.

Alias "/.well-known" "${HEROKU_APP_DIR}/well-known"

And then configured my Procfile to load this.

web: vendor/bin/heroku-php-apache2 -C heroku-apache.conf public/

So far, so good. Except this didn’t work either because I had not given the directory permission in the Apache config. So I expanded my custom config file.

<Directory "${HEROKU_APP_DIR}/well-known">
    Options FollowSymLinks
    AllowOverride All
    Require all granted
</Directory>

This got it working. However, it took my homepage offline. It seems that when you include a custom Apache configuration file, it knocks out the standard DirectoryIndex that Heroku has. Or, there is something else really obviously wrong that I am missing. That’s entirely possible, but I haven’t spotted it yet.

And I did manage to fix it by adding in a new DirectoryIndex to my .htaccess file.

DirectoryIndex index.php

Finally, you have Heroku serving the directory correctly.

How to install Composer inside WordPress

Sunday, March 26th, 2017 | Programming

WordPress has an ancient and ugly codebase. When you are writing plugins, you often want to make your code less horrible and use Composer to bring in dependencies as normal. How do these things fit together?

The first thing I tried was to create plugin-specific dependencies list. Inside the plugin directory, I created a composer.json> file, then ran the install and uploaded it.

This approach works fines when you only use a dependency once and no other plugin uses the same dependency. However, when I wanted to re-use a library in another plugin I had a problem. If I included it twice it would crash.

Installing Composer globally

The solution I came to was to do a global install of Composer. I created a composer.json file in the root and listed all of the dependencies I needed for my plugins in there.

Then, in each plugin, I checked for the file and included it.

if (file_exists(sprintf('%s/vendor/autoload.php', ABSPATH))) {
    require_once sprintf('%s/vendor/autoload.php', ABSPATH);
    add_filter('the_content', 'simple_related_posts', 30);
} else {
    add_action('admin_notices', function() {
        echo '<div class="notice notice-warning is-dismissible"><p><em>Simple Related Posts</em> plugin requires <strong>Composer</strong>.</p></div>';
    });
}

Drawbacks to this approach

This means plugins are no longer self-contained. You have to install the plugin and add the dependencies to your central composer.json file. That is messy.

With the code above, it does not check if the _correct_ dependencies are there. This is something you could add in. However, given the problem above, it seems like it would require so much manual management anyway that I would know what was going on.

Optimise for performance

If you are using Composer on production, do not forget to optimise the autoloader before uploading your files.

composer dumpautoload -o

Conclusion

Personally, I would rather lose plugins being entirely self-contained and benefit from Composer libraries. This approach works well for me because they are purpose-written plugins for my blog.

However, this approach would not work well if you were publishing your plugins as most WordPress users would not know what was going on.

How to run Webpack Dev Server with PHP

Monday, March 20th, 2017 | Programming

You are making an awesome new JavaScript-based app in React. However, it needs to live inside an existing framework, such as Symfony for PHP. You want the hot-reloading function that you get with Webpack Dev Server, but you also need the content to be served from your LAMP stack because it creates the HTML wrapper page.

What do you do?

The answer is to run two servers: both Webpack Dev Server and your existing Stack. Here is how…

Configuring Webpack

Start by installing Webpack Dev Server as usual.

npm install --save-dev webpack-dev-server

Create a script entry in package.json to run it:

"scripts": {
    "start": "node ./node_modules/webpack-dev-server/bin/webpack-dev-server.js"
}

We also need to make one change to our webpack.config.js file. We need to tell the output to point back at the Webpack Dev Server. Otherwise, it will point at your LAMP stack.

output: {
    publicPath: 'http://localhost:8080/scripts/'
}

Super. Next, let’s configure the LAMP stack.

Configuring your existing server

This step is easy. All we need to do is to point the JavaScript at the Webpack Dev Server.

Let’s say you have this at the moment:

<script src="/scripts/app.js"></script>

Change it to:

<script src="http://localhost:8080/scripts/app.js"></script>

Remember that when you are building for production, you will want to take the changes out. The easiest way to do this is to have a dev webpack.config.js file, and a production one, and have your build tool use the correct one depending on the context.

Building an online checkout with Stripe and React

Monday, March 13th, 2017 | Programming, Tech

Worfolk Anxiety recently launched its web store. We build this for a number of reasons. One is that it gives the customer a better experience because they can buy one eBook and get it in every format. Another is that it makes it a lot easier for us to offer upsells and tripwires.

Payment processor

We’re using Stripe as the payment processor. Stripe has become very popular over the past few years because it allows you to build an entirely integrated checkout process without any mention that Stripe is behind it.

How do they do this without requiring you to have PCI compliance on your server? It is all done client-side. You include their JavaScript library. This hashes the credit card details the customer enters and sends it off to stripe’s servers. Stripe then send you back a hash that you can then use to make server-side credit card charges.

Using React

Given so much of the work has to be done in JavaScript, React was a good choice for building the checkout. This allowed me to make it interactive and give the user clear and speedy feedback.

In the case of our checkout process, you are asked to enter your credit card details. Once you have done this, further fields are revealed asking you to enter your name and email address. This step by step approach is a better experience for the customer because they do not get overloaded.

Deploying with Webpack

The finally step is Webpack. This takes the JavaScript and packages it up for the browser. Because the JavaScript is written in ES6, and web browsers only support ES5, it first uses Babel to transpile it back to ES5, before loading everything into one single module and compressing it.